How to Integrate Snowflake with Mule 4 ?

Consuming REST Web service and publishing to JMS using Mule 4
December 8, 2020
Microservices in Mulesoft
December 11, 2020Snowflake Integration through Mule 4 :
Integrate Snowflake with MuleSoft : Inserting row data to the Snowflake table using Mule 4Â .
Challenges to User/Developer
Establishing Snowflake connection.
Solution
Create a table in the Snowflake and add the required columns.
Approach- Integrate Snowflake with MuleSoft
Create a Mule 4 flow to insert a row to the into Snowflake.
Snowflake –
The Snowflake data warehouse is a cloud-based tool that supplies companies with flexible and scalable storage while simultaneously hosting solutions for BI. There’s no hardware or software to select, install, configure, or manage, so it’s ideal for organizations that don’t want to dedicate resources for setup, maintenance, and support of in-house servers.
Technical Solution –
Integrate Snowflake with MuleSoft
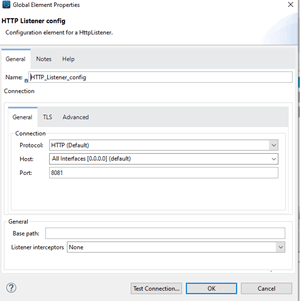
- Create a Mule 4 flow in a Mule project and add an HTTP Listener component to it.
- Configure the listener by adding the necessary protocol, host and port, and endpoint.
- Add Insert component to the flow and add a connector configuration by selecting the Connection as Generic Connection with the necessary URL and Driver class name
For example:
URL: jdbc:snowflake://youraccountname/?db=DEMO_DB&warehouse=COMPUTE_WH&schema=PUBLIC
Driver Class Name: net.snowflake.client.jdbc.SnowflakeDriver
Username:Â yourusername
Password:Â yourpassword
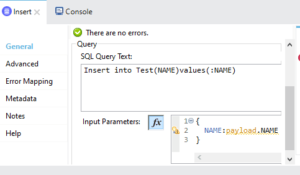
- Add the Insert query to the SQL Query Text and set the input parameters for the columns in which you are expecting to add the row data.
- Add the transforming message to see the output payload.
- Save and run the flow.
- Once the build and deployment are successful.
Send the request through postman by giving the necessary host, protocol and endpoint details which are provided in the HTTP listener.
If the response status is 200OK the row data will be added to the Snowflake successfully.
Advantages–
Row data can be added successfully to the Snowflake.
Conclusion–
Using this way the Snowflake can be easily established and rows can be added successfully to Snowflake and we can achieve Snowflake Integration through Mule 4